How to Email a Professor

The end of any university semester brings the usual anxiety of many exams, papers and final projects due before summer vacation. One of the best things about professors in the United States and the United Kingdom is that they are approachable and available to help with your questions and concerns. We definitely would recommend to take advantage of professors’ office hours! While there are many different ways to email a professor, the following steps will ensure that your request is both polite and direct when written in English.

Subject Line: This is the first way to signal to the professor what you are requesting. Your subject line should be short, clear and summarize the type of request you are making. Your subject line should NOT be a sentence or an outright request for something:

Bad Subject Lines:

  • Help!Wake Forest junior Kelly Rumbaugh ('12), a double major in computer science and mathematics, talks with computer science professor Jennifer Burg, left, in Burg's office in Manchester Hall on Thursday, September 2, 2010. The two were discussing Rumbaugh's computer-generated music project.
  • I need you to…
  • Can you do this for me?
  • Your Name

Good Subject Lines:

  • Question about History 206 Final Assignment
  • Office Hours Appointment Request
  • Interest in Biology 101 Course
  • Final Exam Conflict

Greeting: This should be a formal greeting, such as Dear Professor Smith or Dear Dr. Jones.

Introduction: University professors meet thousands of students and often are teaching hundreds in one semester. The first thing you should do in the body of your email is to clearly introduce yourself and how you know this professor. Things you should include in your introduction sentence are:

  • Your full name
  • The course you are taking (or previously took) with this professor
  • Any indicators of how they might remembers you, such as a question you asked in class, your last paper topic, an event where you ran into them etc.

Your Request: Now that you have properly signaled the request that you will make, it is time to explain why you are writing. Be clear and concise with your explanation. The most important thing to remember in your writing is that you should not assume anything of your professor. This means using a lot of the conditional tense:

  • Would you be available to meet tomorrow afternoon?
  • Could you assist me with my thesis topic?
  • Would it be possible to still register for your class
  • Given this circumstance, could I please postpone the midterm to next week?

Follow-Up Plan: Conclude your email with a way that you will follow-up on your request using the future tense:

  • I will email you again next week to follow-up.
  • I will stop by your office tomorrow to discuss this possibility.
  • I can stay late after class on Tuesday to meet with you.

Sign-Off: Sign your email with one of the following formal closing phrases, as well as your full name:

  • Sincerely,
  • Regards,
  • Best,

Best of luck with your finals and the end of your semester!

Advertisement

ESL Write Away’s First-Ever Essay Contest!

ESL Write Away is hosting its first-ever writing contest! The ESL Write Away Essay Contest aims to encourage English Language Learners to practice their English writing by sharing and connecting with other students around the world.

Deadline to Submit: March 20, 2016 at 11:59 EST

To enter:

Write an original essay (maximum 750 words) in English that describes your hometown or home country. What do you love about where you are from? What is something unique? What would you like to change or improve? As an option, you can also submit a photo along with your essay.

Email your submission as an attachment to eslwriteaway@gmail.com prior to March 20, 2016 at 11:59 EST for full consideration

Read on for more details and prizes on our Contest page!

Prepositions of Time

Prepositions are definitely one of the trickiest parts of the English language and can be extremely frustrating to English language learners. When writing, you can take the time to double check how you use prepositions and get comfortable using the correctly with some basic rules that simplify when they are used. In this sense, time is used either related to time as it is measured on a clock, or time as it is measured on a calendar. In these circumstances, the most commonly used prepositions of time are IN, AT and ON.

So when do we use in vs. at vs. on?

IN AT ON
General Time Specific Time Specific Dates
General Dates “Night”
Future Quantity of Time

Let’s look at some examples…

IN

The preposition “in” is used when looking at general chunks of time. Think of a calendar or a clock. If you are talking about a portion of the calendar or clock that is larger than its individual unit of measurement (a day or an hour/minute) you use “in.”

image description

General Time

  • Time of day: In the morning/afternoon/evening/night…
  • Time of year: In Spring/Winter/Summer/Fall…

General Date

  • Year: In 2016…
  • Month: In May…
  • Week: In the third week of May…

The exception to this description of using “in” for general chunks of time is with the example below. Notice how this use of “in” only relates to a future time. This is indicated by using the word “will.”

Future Quantity of Time

  • In 5 minutes, the show will start.
  • I will meet you outside your house in 3 hours.
  • I will be done in a minute.

AT

clock-1196246Now if you zoom in and look at time as it relates to the clock, we use “at” to talk about a specific time

  • Hours: The concert starts at 7pm.
  • Minutes: At 6:37am everyday, the rooster crows.
  • Point in Time of Day: Cinderella had to run home at midnight.
  • Activity Time of Day: We met at lunchtime to discuss the problem.

A confusing instance where both in and at can be used is with night. It is correct both to say:

  • She woke up when she heard a noise in the night.
  • She could not sleep because of the sound of crickets at night.

The difference is comes from when the action occurred. “In the night” is more poetic and often refers to something happening in the middle of the night at a specific instance (a noise). “At night” is then used more generally, to refer to something happening (the sound of crickets) during the whole night. This is the opposite of the usual use of in for general and at for specific.


ONcalendar-1-1588745

Lastly, there is the preposition, “on,” which we use when talking about specific dates. This time, zoom in on the calendar to know when to use “on.”

  • Days of the Week: On Tuesdays, she goes to English class.
  • Dates: The last time she saw her cousin was on June 30th (or on the 30th of June).
  • Holidays: Have you seen the big parade in New York City on St. Patrick’s Day?

Can you use all 3 in one sentence? Here are some examples:

  • On Valentine’s Day, in 2005, she met her date at 6pm for dinner.
  • In Spring, he went to a concert, on March 21st , at noon.
  • She is going to call on Wednesday at 10pm, which is in exactly 24 hours.

Check out this dominoes game from Teach-This.com to test your understanding create some more sentences!

How do you remember the differences between in, at and on? Tell us in a comment!

Happy Writing!

Feature Writing

clip-art-of-extra_extra-pic-of-front-page-of-newspaperDiving into a piece of writing is so exciting; analyzing and realizing what the author could mean by a certain word, phrase or line is satisfying. As long as you have the evidence to support your claim, you cannot be wrong. However, you can be well-versed at analysis and yet, completely unaware how to write for a newspaper or Internet news. Feature writing in journalism is a whole other ball game. Learning different writing styles can come in handy to make yourself marketable in the job world.

To show the various parts of a features story I will use a piece I wrote as a features intern for the Vineland Daily Journal in Vineland, New Jersey. The terms to describe the parts of the writing are put in [brackets].

[Title] Artist sees the light

[Subhead] Millville painter innovates to make canvas come alive

Features writing allow you to be more creative than straight news. Try to think of a title that will grab people’s attention. Keep it short and sweet. The subhead allows you to explain more about the story. When you read “artist sees the light” you know the story will be about an artist who has achieved something. The subhead explains that he uses an unusual method on a canvas.

[LEAD] MILLVILLE — Dennis Tawes is trying something new on Millville’s art scene

The well-known “pioneer artist” who helped Millville launch the Glasstown Arts District has been hinting about his latest project for months, and finally will unveil his proud work at the city’s Third Friday festivities this week.

In his small art studio at The Village on High, Tawes has been working on a new technique that he hopes will change the way people view his paintings

The lead tells who, what, when, and where the article is talking about. An ideal first line is short, and should be slightly vague so it hooks the reader and encourages the reader to keep reading. It introduces the topic, without giving away the whole story.

[NUT GRAPH] By using LED lights on a canvas to manipulate color, flower petals change hues, a Ferris wheel moves and a woman’s mask disappears from a painting. The use of bright colors is key in Tawes’ work, which is ironic because the artist says he has difficulty perceiving bright hues.

In a nutshellThe nut graph is a sentence or paragraph that states the focus or the main point of the story. It should tell in a nutshell what the story is about and why it is newsworthy. This nut graph explains the technique used by the artist, and an interesting tidbit that the artist himself may not be able to accurately see the hues he is creating. This topic is newsworthy because it is an unfamiliar art technique, and because of the limitations of the artist.

LEDism, as he calls his latest obsession, started about a year ago.

[LEAD QUOTE] “My son hung up some of my paintings in his room where he happened to have an LED light,” Tawes said. “We noticed some of the colors were transforming. Artists focus light upon the subject (of) the canvas, (so we thought) what about focusing outside light onto the canvas, and it evolved from there. I started experimenting.”

The first quote that backs up the lead is called the lead quote. It is usually the strongest quote in the story and it supports the concept in the lead without repeating the same wording. This quote explains the origins of LEDism. Make sure to attribute quotes to proper sources. Ideally, a news/features story should have at least one quote from three different people (at least three quotes in total, depending on length). Since this story is about one person, quotes from just the artist are acceptable. To expand, I could have included quotes from his wife, son, or peers. My editor did not want that, so we just included the artist.

[IMPACT] Through his experimentation, Tawes realized pure color responds to LED lights.

“It’s a whole new different idea, even with painting, because I cannot think in terms of painting how I normally paint,” he said. “I have to think of how the light is going to affect the painting itself.”

Setting out to change how people view paintings, Tawes said this method “enhances” what the viewer sees and “reinvents” the painting.

“In my artistic career over the past 30 years I have endeavored to achieve something new with my art, something that had not been seen before,” he said.

He was hoping to combine modern technology and capture the movement of everyday life. To this point, he has only shown a handful of people his latest paintings; Tawes said he has received positive reactions.

Impact

The impact shows the readers why they should care. This method could “change how people view paintings” according to Tawes. Therefore, it is significant to the art world, but also to the common reader who views art.

[Elaboration Quote] “I haven’t changed my painting style, so it’s expressionist. (I) dabble a little in abstract, but with LED lights, when I first started thinking about it, it’s like a new level in modern art,” Tawes said. “It makes you question more of what you’re looking at. At one point it’s red, now it’s black or turns purple. How did it do that?”

Quotes can stand alone as added information for the story. Instead of me as the writer explaining the methodology, it’s more impactful when the subject explains in his own words. This elaboration is simply added information for the reader.

[Ending] Tawes can’t imagine a different life for himself.

“You raise the so-called bar to a different level where it’s just a natural growth. I don’t want to be cookie-cutter or paint what I think the market wants. That’s not why I paint,” he said. “It’s just waking up and doing what I do.”

Depending on the subject, the ending will vary. This ending is a wrap-up quote. It explains that Tawes will continue to work on his LEDism. You don’t want to repeat information given previously in the ending. Concluding with a quote is a popular way to end features stories.

Find Your Voice!

Find Your Voice!

Just like an essay, there is a structure to features writing. Following the format above is useful to create a features story. Be sure to add some creativity to the piece, so you can have a “voice” in your features story! If you need help with any kind of writing, please contact us! 🙂

Happy Writing!

By Ally Evans

That, Which or Who?!

My sister, who I love a lot, has a big sweater that has many holes, which get bigger every time she wears it.

Have you ever been confused by when you use that, which or who to describe the subject of your sentence? So were the students in the English class I am currently teaching! However, with the handy chart below and some easy steps, it’s easy to figure out which word to use in your descriptive clause.

Subject Punctuation   Type of Information
Place/Thing  None That Defining

Which Non-defining
Person None Who Defining

,

Non-Defining

STEP 1: Find the Subject

The sentence above has two different subjects that are described by clauses. The first subject of the sentence is “my sister,” then the second is “a big sweater.”

STEP 2: Determine the Type of Noun

Is the subject of your sentence a person or a place/thing? The first subject, “my sister” is a person noun while the second noun, “a big sweater” is a thing.

STEP 3: Determine the Type of Information

Defining information is anything that is necessary to provide so that your reader can understand what the subject is. Meanwhile, non-defining information simply gives extra detail and could be taken out of the sentence easily. For example, the information that the sweater has many holes is necessary to identify this specific sweater. On the other hand, the fact that the holes get bigger each time your sister wears the sweater does not define the sweater and is extra detail.

STEP 4: Choose Your Word Using the Chart. Click here to download it from our Resources page.

STEP 5: Add Punctuation.

While you might get by when speaking using any of these words, it’s best to be correct in writing 🙂 This is even more important when adding in the correct punctuation. Non-defining clauses should be surrounded by commas “,” the punctuation marks that indicate a pause in the sentence. These marks also indicate that the clause could be excluded from the sentence and still make sense. For example, in the sentence above, you could take out “who I love a lot,” and the sentence would still be grammatically correct!

In this type of sentence, which will always come after a comma, but who either has a comma before or does not depending on whether the information is defining or non-defining. 

Have questions? Contact us, we’d love to hear from you!

7 Tips for How to Edit Your Writing

Did someone forget to proofread?

Did someone forget to proofread?

Proofreading is one of the most vital or important parts of the writing process. A piece of writing, free of errors, is the optimal accomplishment. Knowing how to edit is important to effectively communicating as a writer. For example…

You can be reading a fascinating piece of work. Then, their’s a typo. Amistake. It ruins the credibility of the writer, and the reader experience. Can you spot the mistakes?

Try these 7 tips for how to edit you writing:

  1. Look at work as a whole – Concentrate first on the organization, focus and theme of your writing. Before editing sentence structure, make sure your writing has the message you want to convey.
  2. Set it aside– Don’t try to proofread as soon as you finish a draft. Walk away from the draft for at least 15 minutes before attempting to edit. This way, you can clear your mind a bit and come back with fresher eyes.
  3. Print out your writing– Reading on a computer screen is difficult. It boggles my mind that Kindles are such a huge success; a paperback book is always my preference! For the eyes, it’s often less straining to read from a piece of paper. When you print out your work, use a red pen to correct mistakes or adjust wording so that you can notice your corrections immediately.
  4. Read the text aloud– Try to read each word as it is written on the page, not what you THINK you wrote. You thought of the sentence, “The dog is fluffy.” You actually wrote “The dog s fluffy.” You know what you are trying to say and may read the second sentence as “The dog is fluffy.” Reading slowly and paying attention to each word will help catch mistakes.
  5. Have someone else look at your work- A second pair of eyes is an amazing tool to use when proofreading. The outside reader can provide valuable feedback if something doesn’t make sense to them. It could be a word, a sentence or an idea. It will be clear to you as the writer, but an outsider who has general knowledge of your topic should also be able to understand your writing.
  6. Use a dictionarySale and sail. They are both words that are spelled correctly. However, if I wrote “The 50 percent off sail was amazing,” spell check will not (and did not) catch that mistake. It should be “The 50 percent off sale was amazing.” A dictionary is a fantastic tool to use in instances when you are unsure if a store’s promotion is a sail or a sale.
  7. Proofreading ChecklistMake a personal checklist– From previous writing, you will know what types of mistakes you typically make. Pay special attention to those. Is it forgetting a period at the end of a sentence? Maybe homonyms (to, too, two) are your downfall. Making a list and checking specifically for those mistakes will greatly help eradicate them from your writing.

Do you use a proofreading technique not included in this list? Let us know!

We love to proofread 🙂 Need a second editor? Start writing with ESL Write Away today!

By Ally Evans


Crafting a Cover Letter

So now that you’ve mastered your resume, how about that cover letter? Even though it is sometimes considered optional, cover letters are a great way to personalize your resume and describe your passion for whatever position you may be applying. Although every job market is different, for English-speaking countries, strong cover letters follow the pattern described below. Also, your cover letters is a great way to show evidence of your English skills to an employer in an English-speaking country!

Cover Letter Example

Even though most applications are done online these days, the formatting for cover letters is still formally stuck in the past. For formatting there are 4 main parts:

1. Your contact information goes at the top center including:

  • Name
  • Address
  • Email
  • Phone number

2. The written-out date goes at the top left, ex: April 17, 2015.

3. The contact information for the recipient goes above the salutation on the left side:

  • Name
  • Title
  • Company
  • Address

4. The greeting continues on the left: qTBX7j46c

  • Dear Mr./Ms. ______,
  • Dear Hiring Manager,
  • To Whom it May Concern,

5. Your signature goes at the bottom left:

  • Closing compliment
    • Respectfully,
    • Sincerely,
    • Regards,
  • Your written signature
  • Your typed name

With the formatting done, all that’s left is to write what makes you the best candidate for the position! Although you should write a different letter for each position, the general idea for each cover letter is the same. You can break down your paragraphs with the following checklist of what to mention in each one:

Paragraph 1: Introduction

  • The position for which you are applying and the name of the company or organization
  • How you found out about the position
  • Your “thesis” that you are the best candidate for the job

Paragraph 2: Why?

  • Research the company and position and brainstorm how your experiences match what they are looking for in a candidate
  • Pick one or two examples and go into detail about how those experiences show why you are a great fit for the role

Paragraph 3: Conclusion

  • Talk about the company as a whole, why you are motivated to work them, and how this position fits into your future plans
  • Thank them for considering your application
  • State a plan for following up

Applying for a position in an English speaking country? We can help you write an awesome cover letter! Get started here 🙂

The Importance of a First Line

The best day of her life was also the worst day of her life. Exhausted, tears chased each other down her cheeks, and while a smile threaded her lips it did not quite reach her eyes.

clip-art-reading-556419Are you still reading? Then the first line has done its job!

Has anyone ever told you, “Once you get past the first few chapters, this book is awesome!”? Then that book has not delivered for its readers. The first chapter should knock the reader off his or her feet and keep them wanting more. The first line of any piece of writing should enrapture and interest. Without that initial interest, readers will not be excited to keep going.

The example used in the first lines of this post is geared more towards a creative writing piece. However, any type of writing, whether it be an essay, admission letter, research proposal or novel, deserves a killer first line.

Some ways to begin a piece of writing can include:

  • Quotations – A thought-provoking quotation that hones in on the central theme of your piece is a great way to start. Sometimes, someone has already said it best! Use their words and always give credit by putting their words in quotes, followed by the speaker’s name.
  • Questions – If you want your reader to stop and think for a moment after the first line, start with a question. If you are writing a college admission essay about the importance of a family recipe, you may want to ask the reader “Do you remember the aroma of your favorite food growing up? That feeling of family, and the anticipation of the delicious dish that is about to tickle your taste buds?” The reader should experience a more sensory attachment to your writing, and most importantly continue reading.
  • 9781599869513_p0_v1_s260x420In medias resIn medias res is Latin for “into the middle of a narrative; without preamble” according to dictionary.com. Oedipus the King is a famous example of in medias res. As the story begins, Oedipus steps out of the royal palace of Thebes and is greeted by a procession of priests, who are in turn surrounded by the impoverished and sorrowful citizens of Thebes. Thebes has been struck by a plague, the citizens are dying, and no one knows how to put an end to it. There is no preamble to introduce Oedipus or his city; by starting in the middle of the action the reader is intrigued to both learn the back-story of Oedipus and the future of Thebes and its King.
  • Images – A descriptive adjective is a vivid way to begin a piece. You can describe candlelight flickering, a torch’s firelight dancing, or a match’s top struggling to give it beholder enough warmth.

What is your favorite way to deliver a first line? Happy Writing!

By Ally Evans

Ally Evans is a recent college graduate living in New Jersey. She is currently a Festival Coordinator for an arts program. When she is not at the office, Ally loves reading, writing, playing volleyball and going out to eat with friends. Her favorite books include The Count of Monte Cristo by Alexandre Dumas; The Kite Runner by Khaled Hosseini and The Shining by Stephen King. She is excited to bring her passion for reading and writing to ESL Write Away LLC!

10 Tips to Write an Awesome Resume

resume-clipart-Clipart-resumeSummer is right around the corner and perhaps, you’re looking for a change of pace or a summer job. Anytime you’re applying for jobs, internships, schools, scholarships etc. you have to create that dreaded thing…your resume. Nowadays, especially for students, the resume is replacing the CV because having only one-page to look at is much easier for whoever will be judging you as an applicant. Yes, it’s unfortunate to reduce all of your awesome experiences down to one-page, but we can do it!

8b83f74a79836e0c692d4556513fbd40

  1. Target Your Audience 

Often, you are writing a resume because you have a specific job in mind. Take the time to research what position and location you are applying for. This will give you clues about what they are looking for in applicants. For example, if you’re applying for a university, look at what program you are interested in studying or the culture of the school as it is described on the website. If you’re applying for a job or internship, read through the company’s website.

Most importantly, read between the lines of the job description. This will tell you what kinds of skills or capabilities they need for the work in that position. For example, if the job description says, “Assist with writing newsletter articles, press releases, talking points, development materials, promotional items, etc,” you know to highlight your skills as a writer and editor in your resume!

  1. Create Your Brand

Now that you know what the employer or admissions committee is looking for, think about what makes you the uniquely best person to fill that need. Your personal brand is the way that you want people to think of you as a student or employee. If you’re applying for a position in a different country than where you are from, you already have a personal brand as a a motivated worker, who thinks outside the box and can bring a fresh perspective!

images

Take some time to list out all of the experiences you have that relate to the job description. Now step back and try to draw connections between your experiences. For example, let’s look at a list like this:

  • Writer for my school newspaper
  • Personal blogger
  • Social media manager for local business
  • Web design for my dad’s band

This person’s personal brand might be a strong original writer and web strategist for small businesses.

  1. Categorize Your Experiences

Take your list of experiences and begin to categorize them based on what your resume audience is looking for. Remember that your resume will be looked at very quickly so the more organized it is, the more that the reviewer will be able to learn about you in a short time. Your categories should be based on both your experiences and the specific skills your audience wants. For example, if the position for which you are applying requires foreign language knowledge, you would want (and always should have) a category on your resume that is labeled “Foreign Languages.” The three main categories that should always be included on your resume are:

207901791_10coj1t_xlarge

  • Education
  • Work Experience
  • Relevant Skills

Then within each of these sections, you can create sub-sections based on your specific skills and experiences, such as:

  • Foreign languages
  • Research
  • Awards
  • Web Design
  • Publications
  1. Less is More

At this point, you’ve done some really awesome brainstorming and have come up with all of the evidence that makes you an ideal candidate for this opportunity. Even though this is exciting, we have to take a minute and remember that all of this information is going to fit on one normal-sized page! No matter how many great things you have done that might all be relevant to the thing for which you are applying, a big part of your resume is its presentation. Specifically this means that it should not be cluttered to the point where the reviewer cannot find your personal brand. Look at your list and categories and think about which experiences are most relevant to the position and show the most about of what you are most capable.

For example, although it would be nice to describe the time you volunteered at an animal shelter, if it was a short-term commitment, you did not have a leadership role and the position you are applying for does not involve animals, it doesn’t need to be taking up space on your precious one-page.

Unknown

  1. Reverse Chronology 

Another way to pick your most important and relevant experiences is to think about what you have done most recently. The structure of your resume should be in reverse chronology, or going from the present to the past. The top experience in each category should be the experience that happened the closest to the date you are applying.

This is especially important as you get older and gain more awesome life, academic and professional experiences. For example, once you are in your third year of university, you should not be listing experiences you had in high school (secondary school) on your resume.

  1. Don’t Assume

When your reviewer picks up your resume, they should be able to quickly understand where you were and what you did. This is especially important for international applicant as education systems and known organizations/companies vary from country to country. With each experience you list, you need to both describe what type of work it was in addition to what you specifically did. Often when I write my resume, I assume that the reviewer knows exactly what I’m talking about and so I forget to clearly explain.

For example, say that you volunteered at a place called One World Plants and spent your time teaching young children how to garden plants using seeds from all over the world. Your first bullet point should incorporate a brief description of the mission and purpose of One World Plants with your specific role that you played there. An example might be, “Worked one-on-one with young children to learn about the processes of planting seeds from around the world at this organization focused on bringing global awareness through sustainable agriculture.”

  1. Use Action Words action-clapboard

Notice how in our hypothetical role at One World Plants we started our sentence with the past tense action verb, “Worked.” For all of your descriptions of each experience, use these past tense action verbs to start each bullet point or sentence. Your resume shows what you can do and therefore this style immediately shows your reviewer what you have done in the past that can contribute to what you can do in the future!

Here is a link to “185 Powerful Verbs That Will Make Your Resume Awesome” that you can use when writing your resume: https://www.themuse.com/advice/185-powerful-verbs-that-will-make-your-resume-awesome

  1. Be Consistent in All Things

If you’ve been following all these steps, you should now have almost all of your content for your resume! You have your experiences, categories, timeline and descriptions and now, it’s time for the fun part: formatting and fitting it all onto one page 🙂 This often takes getting creative with the use of bullet points, italics, bold font, different size fonts, expanding your margins, playing with spacing etc.

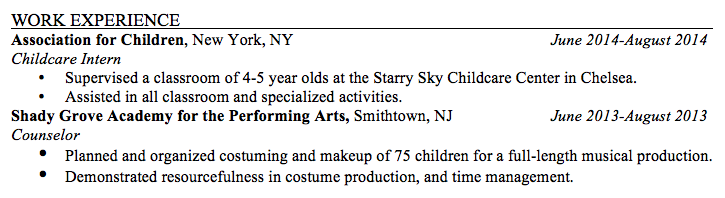
There is no one correct way to format your resume, but my main word of advice is to be consistent. If you are going to put a job title in italics, put all of your job titles in italics. If you are going to bullet point all of your description sentences, bullet point ALL your description sentences. Here is a sample format for a resume section:

Resume Example

Here we have different formatting to distinguish the different important components of each experience:

  • WORK EXPERIENCE= the experience category in caps lock
  • Association for Children= the name of the organization in bold text
  • New York, NY= the location of the position in regular font
  • Childcare Intern= the job title in italics
  • June 2014-August 2014= the timeframe of the experience in right-aligned italics
  • Supervised a classroom of 4-5 year olds at the Starry Sky Childcare Center in Chelsea. = the first description, using bullet points, starting with a past-tense action verb, giving a description of where and what the organization way

In addition, notice the use of reverse chronology and the creation of a personal brand!

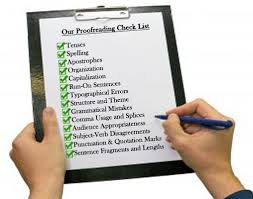
  1. Know your punctuation

You’re almost there! Now’s the time to put those finishing touches on your resume. Is everything necessary capitalized? Do you have periods at the end of each statement? Part of being consistent is making sure that all of your punctuation is the same and complete.

  1. Stand out!

iamanexpert
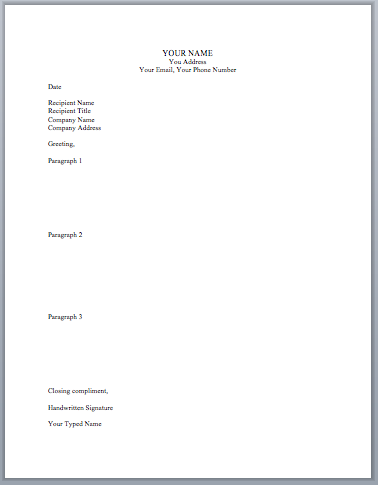
Your resume is all about showing how awesome YOU are; so don’t be afraid to stand out! Start by putting your name really big at the top (and your contact information), so that your adoring fans can reach you. Then, read through all of your experiences and add details to emphasize the amazing things you’ve done. Bragging isn’t always welcome in conversation, but your resume is the perfect place to show off your accomplishments.

Inspired? Ready to start? Want some help? Click here!

If you’d like to see an example of my resume, send me an email!

I look forward to working with you to get that dream job, internship, scholarship…

Write Your Love this Valentine’s Day!

The lovely commercial holiday of Valentine’s Day is only 1 day away (after the more spooky and superstitious occasion of Friday the 13th). February 14th may be full of cards, candy and roses, but true love should come from the heart. For centuries, people have expressed their love in writing, and most famously in poetry.

Test your writing in English skills by making your own version of the fun and famous Valentine’s Day poem:

roses-are-red-violets-are-blue-sugar-is-sweet-and-so-are-you-3

First, let’s break down the poem into lines and pay attention to the rhyming pattern:

Line 1: Roses are red.
Line 2: Violets are blue.
Line 3: Sugar is sweet,
Line 4: And so are you.

Make this poem your own in just a few easy steps!

  1. Think of your favorite colors and come up with words that rhyme with them. For example:
      Green- queen, bean, seen, teen, lean…
      Pink- think, drink, wink…
      White- light, right, kite, sight, night… etc.
  2. Notice how lines 1 and 2 ends with a color. Choose 2 colors and plug them into the poem. Make sure that the rest of the lines make sense with the colors you choose. (Roses are not green, but trees are!)
  3. Now, notice how line 4 rhymes with the color at the end of line 2. Pick one of your rhyming words and plug it in at the end of line 4. Now, make a complete phrase that ends with this word for lines 3 and 4.

Let’s look at some examples:

The sun is yellow.
Trees are green.
You’re the most beautiful thing,
That I’ve ever seen.

Wood is brown.
The night is black.
You stole my heart,
Now bring it back.

What ones can you think of?

Celebrate Valentine’s Day this year by showing your love with your English writing skills 🙂 Happy Valentine’s Day! Happy writing!